If you’re new to hardware verification, you’ve probably heard the term “UVM” thrown around in conversations, job postings, and technical discussions. Maybe it sounds intimidating or overly complex. Don’t worry—this guide will introduce you to Universal Verification Methodology (UVM) in a way that’s easy to understand, even if you’re just starting your verification journey.
What is UVM and Why Does It Matter?
Consider testing a new graphics card before it goes to market. You need to verify that it can handle different display resolutions, frame rates, and graphics operations. Without a systematic approach, you might test 1080p video playback but miss 4K gaming scenarios, or verify DirectX rendering but overlook OpenGL compatibility. UVM provides a systematic framework for building verification environments that ensure comprehensive testing—like having a standardized testing protocol that guarantees you’ve covered all the critical scenarios before shipping your product.
Universal Verification Methodology (UVM) is a standardized way of writing testbenches to verify digital hardware designs. Think of it as a cookbook with tried-and-tested recipes for creating verification environments that can thoroughly test computer chips, processors, and other digital circuits.
But why do we need a methodology at all? In the early days of hardware verification, every engineer wrote testbenches differently. This led to several problems:
- Inconsistency: Every project looked different, making it hard for team members to understand each other’s work
- No reuse: When starting a new project, engineers often had to build everything from scratch
- Poor maintainability: When bugs were found in testbenches, they were difficult to fix and update
- Limited scalability: As designs became more complex, ad-hoc verification approaches couldn’t keep up
UVM solves these problems by providing a standard framework that promotes consistency, reuse, and maintainability. It’s like having a common language that all verification engineers can speak.
The Building Blocks: Understanding UVM Components
Before diving into the technical details, let’s understand the basic building blocks of a UVM testbench using a practical verification scenario. Consider verifying a USB controller chip:
The Test: Your Verification Scenario
A test in UVM defines a specific verification scenario you want to run. Are you testing USB 2.0 bulk transfers, USB 3.0 high-speed data, or power management during suspend/resume cycles? Each test focuses on a particular aspect of your design’s functionality.
// Testing USB bulk transfer performance
class usb_bulk_transfer_test extends uvm_test;
  `uvm_component_utils(usb_bulk_transfer_test)

  usb_testbench env;

  function void build_phase(uvm_phase phase);
    super.build_phase(phase);
    env = usb_testbench::type_id::create("env", this);
  endfunction

  task run_phase(uvm_phase phase);
    usb_bulk_sequence seq = usb_bulk_sequence::type_id::create("seq");
    seq.start(env.usb_agent.sequencer);
  endtask
endclass
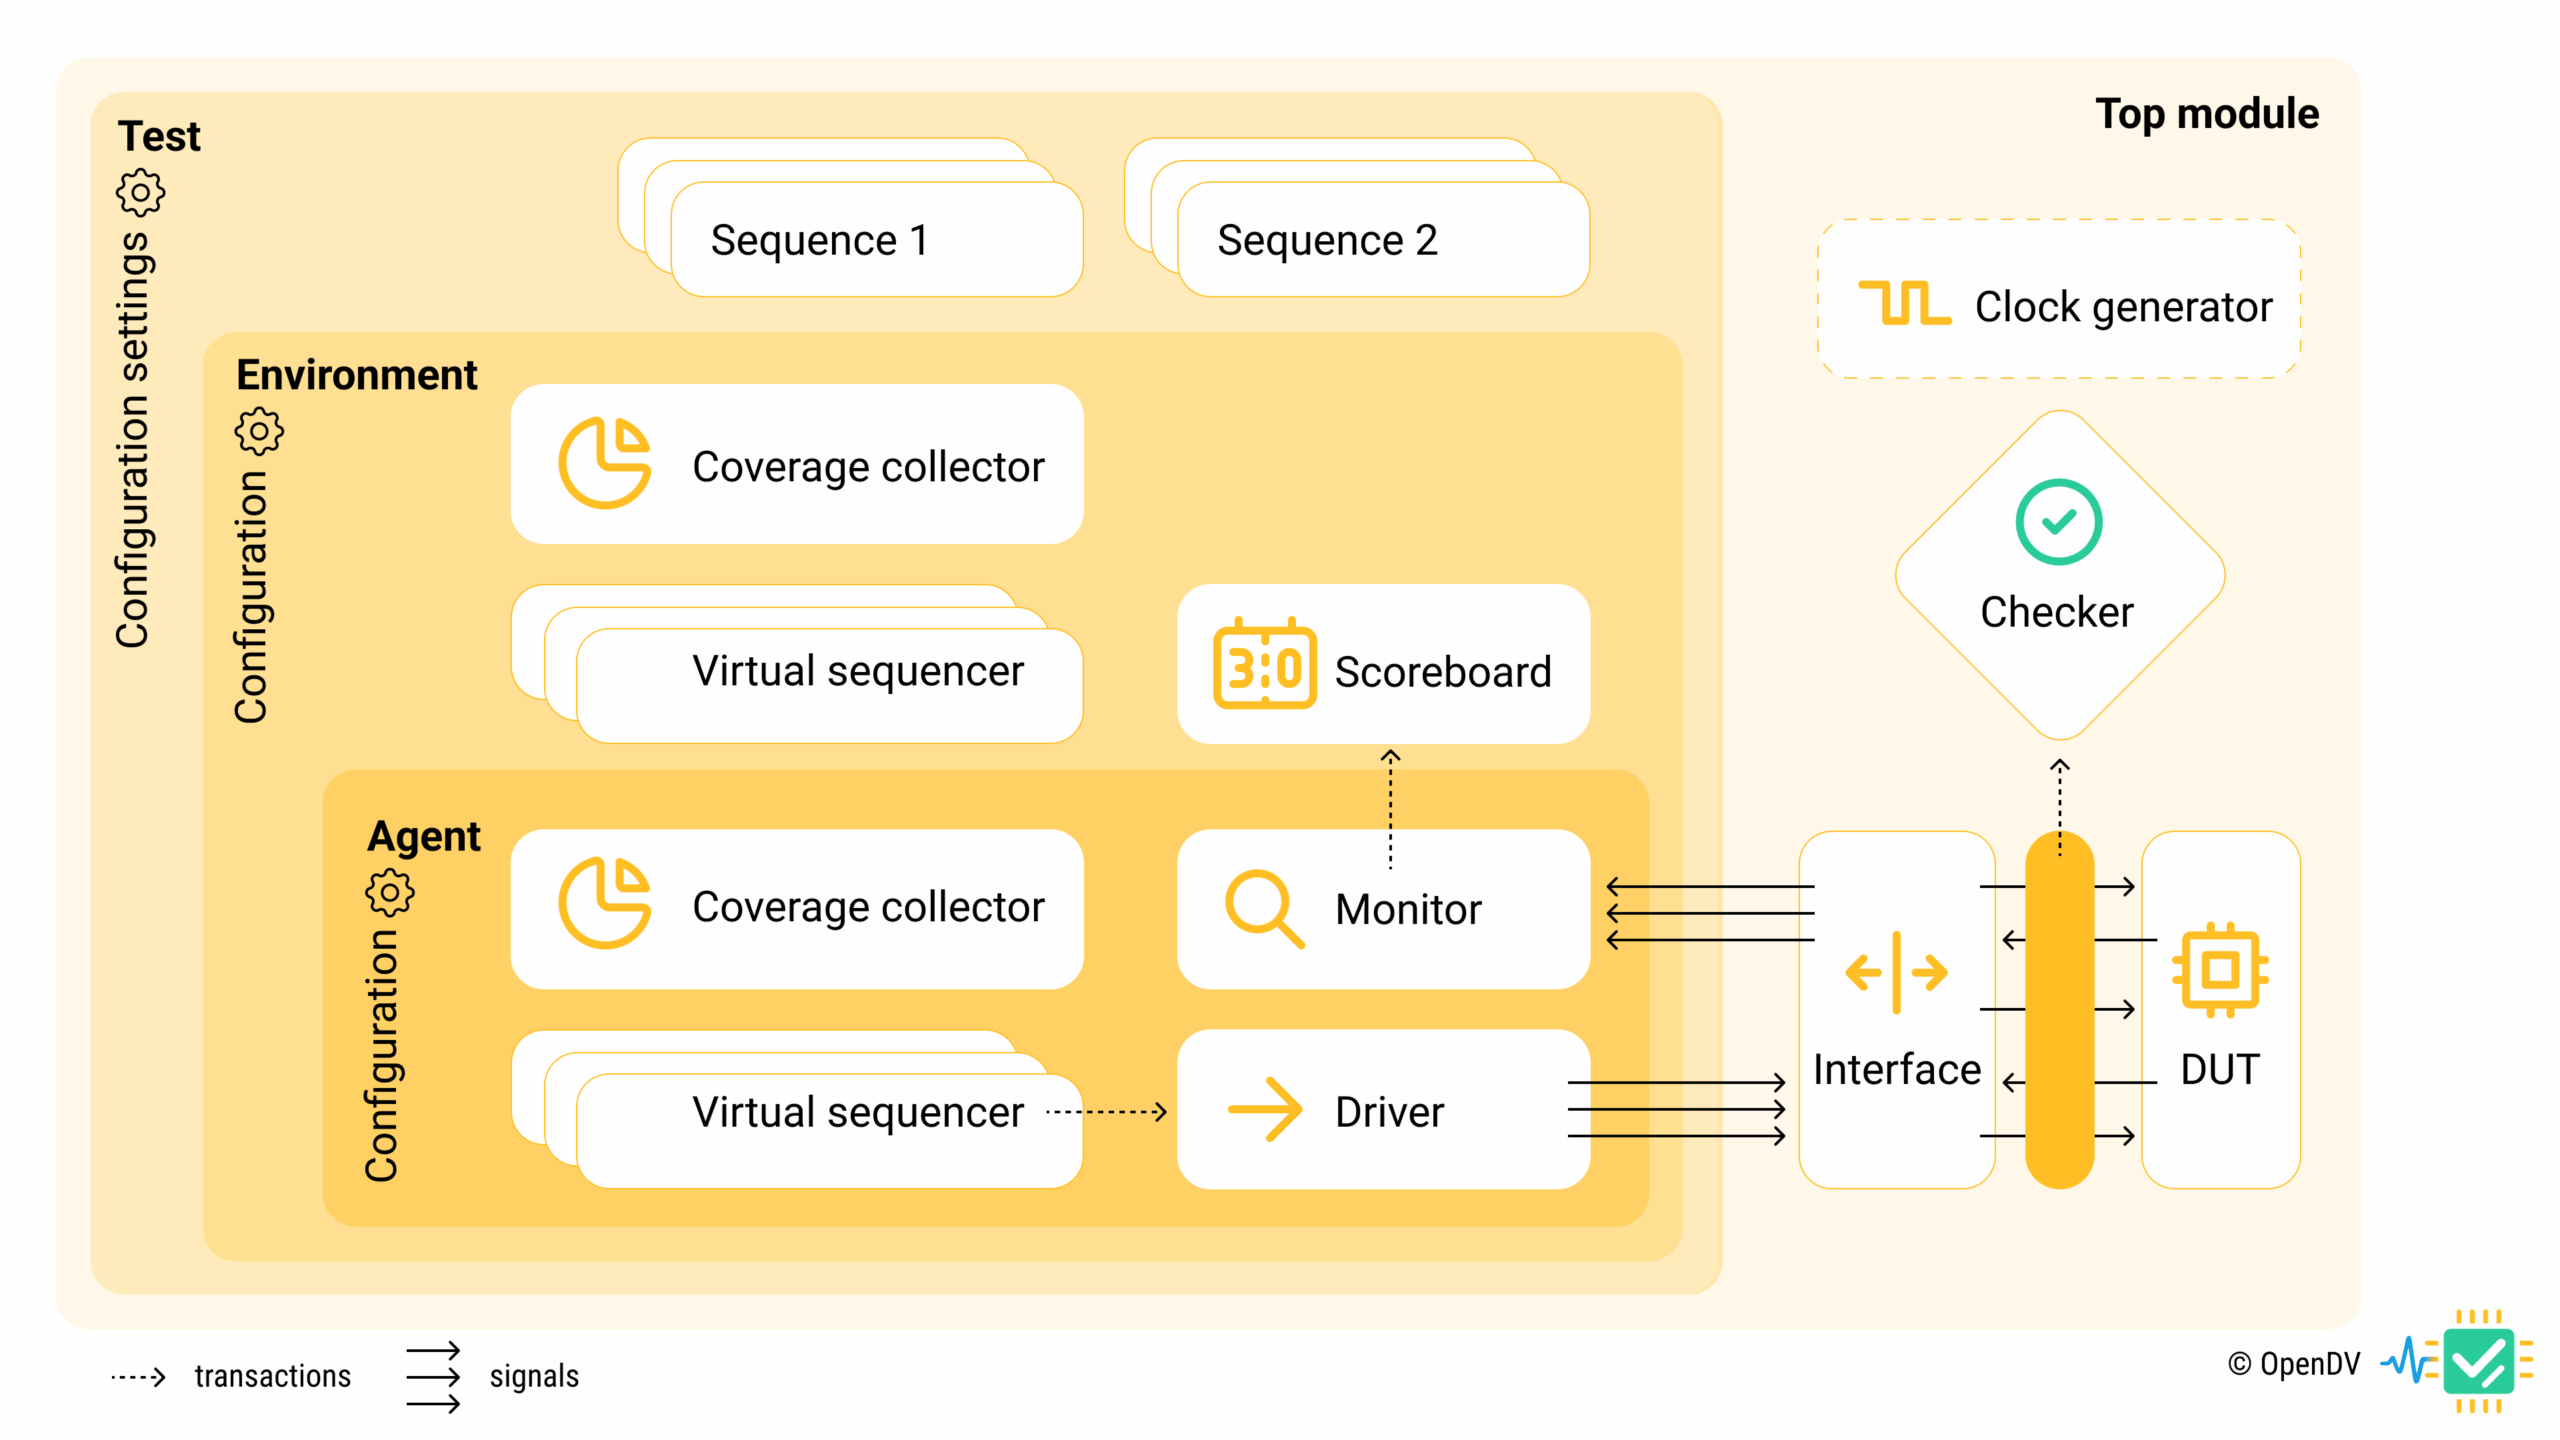
The Environment: Your Complete Test Setup
The environment contains all the verification infrastructure needed to test your USB controller. This includes the components that generate USB traffic, monitor responses, check for protocol violations, and measure coverage metrics.
The Agent: Your Protocol-Specific Verification Component
An agent handles all interactions with a specific interface or protocol. For USB verification, you might have separate agents for the host-side USB interface, device-side interface, and internal register access. Each agent understands the specific protocol requirements and timing constraints.
The Driver: Generating Protocol Traffic
The driver takes test scenarios and converts them into actual signal transitions that stimulate your design. For USB verification, the driver generates proper USB packets, handles timing requirements, and manages flow control.
// USB driver that generates protocol-compliant traffic
class usb_driver extends uvm_driver #(usb_transaction);
  `uvm_component_utils(usb_driver)

  virtual usb_interface usb_if;  // Connection to the USB signals

  task run_phase(uvm_phase phase);
    forever begin
      // Get the next USB transaction to execute
      seq_item_port.get_next_item(req);

      // Convert transaction into USB protocol signals
      execute_usb_transaction(req);

      // Signal completion
      seq_item_port.item_done();
    end
  endtask

  task execute_usb_transaction(usb_transaction trans);
    case(trans.packet_type)
      DATA_PACKET: send_data_packet(trans.data, trans.endpoint);
      SETUP_PACKET: send_setup_packet(trans.setup_data);
      ACK_PACKET: send_ack_packet();
    endcase

    // Wait for USB timing requirements
    #(trans.inter_packet_delay);
  endtask
endclass
The Monitor: Observing Design Behavior
The monitor passively observes your design’s outputs and captures what actually happens during testing. It doesn’t drive any signals—it just watches and reports on protocol compliance, timing violations, and functional behavior.
// Monitor that captures USB protocol activity
class usb_monitor extends uvm_monitor;
  `uvm_component_utils(usb_monitor)

  virtual usb_interface usb_if;
  uvm_analysis_port #(usb_transaction) analysis_port;

  task run_phase(uvm_phase phase);
    usb_transaction trans;

    forever begin
      // Watch for USB activity
      @(posedge usb_if.clk);

      if (usb_if.valid_packet) begin
        // Capture the USB transaction
        trans = usb_transaction::type_id::create("trans");
        trans.packet_type = decode_packet_type(usb_if.data);
        trans.endpoint = usb_if.endpoint;
        trans.data = usb_if.payload;
        trans.timestamp = $time;

        // Send observation to scoreboard and coverage
        analysis_port.write(trans);
      end
    end
  endtask
endclass
The Sequencer: Coordinating Test Scenarios
The sequencer orchestrates the execution of test scenarios, deciding which transactions to send and when. It manages the flow of stimulus generation to ensure comprehensive testing coverage.
Your First UVM Environment: A Simple Example
Let’s build a basic UVM environment to test a simple FIFO (First-In-First-Out) buffer. Think of a FIFO like a narrow tunnel where cars enter on one side and exit on the other side in the same order—first car in is the first car out.
Step 1: Define What We’re Testing (Transaction)
First, we need to define what kinds of operations our FIFO can perform:
// This describes one operation we can do with our FIFO
class fifo_transaction extends uvm_sequence_item;
  // What kind of operation? Read or Write?
  rand bit is_write;

  // If it's a write, what data should we write?
  rand bit [7:0] data;

  // If it's a read, what data did we get back?
  bit [7:0] read_data;

  // Was the operation successful?
  bit success;

  // This macro helps with debugging and printing
  `uvm_object_utils_begin(fifo_transaction)
    `uvm_field_int(is_write, UVM_ALL_ON)
    `uvm_field_int(data, UVM_ALL_ON)
    `uvm_field_int(read_data, UVM_ALL_ON)
    `uvm_field_int(success, UVM_ALL_ON)
  `uvm_object_utils_end

  function new(string name = "fifo_transaction");
    super.new(name);
  endfunction
endclass
Step 2: Create Test Instructions (Sequences)
Now let’s create some test patterns. We’ll start with a simple sequence that writes some data and then reads it back:
// This is like a test script: "Write data, then read it back"
class write_read_sequence extends uvm_sequence #(fifo_transaction);
  `uvm_object_utils(write_read_sequence)

  function new(string name = "write_read_sequence");
    super.new(name);
  endfunction

  task body();
    fifo_transaction write_trans, read_trans;

    // First, write some data
    write_trans = fifo_transaction::type_id::create("write_trans");
    start_item(write_trans);
    assert(write_trans.randomize() with {
      is_write == 1;
      data == 8'hAB;  // Write the value 0xAB
    });
    finish_item(write_trans);

    // Then, read the data back
    read_trans = fifo_transaction::type_id::create("read_trans");
    start_item(read_trans);
    assert(read_trans.randomize() with {
      is_write == 0;  // This is a read operation
    });
    finish_item(read_trans);

    // Check if we got back what we wrote
    if (read_trans.read_data == 8'hAB) begin
      `uvm_info("SEQUENCE", "Success! Read back the correct data", UVM_MEDIUM)
    end else begin
      `uvm_error("SEQUENCE", $sformatf("Error! Expected 0xAB, got 0x%02h",
                 read_trans.read_data))
    end
  endtask
endclass
Step 3: Build the Driver
The driver takes our test instructions and actually applies them to the FIFO:
class fifo_driver extends uvm_driver #(fifo_transaction);
  `uvm_component_utils(fifo_driver)

  // Connection to the actual FIFO hardware
  virtual fifo_interface fifo_if;

  function new(string name, uvm_component parent);
    super.new(name, parent);
  endfunction

  function void build_phase(uvm_phase phase);
    super.build_phase(phase);
    // Get the interface connection
    if (!uvm_config_db#(virtual fifo_interface)::get(
        this, "", "fifo_if", fifo_if))
      `uvm_fatal("NO_IF", "Could not get fifo_interface")
  endfunction

  task run_phase(uvm_phase phase);
    forever begin
      // Get the next instruction
      seq_item_port.get_next_item(req);

      // Execute it
      if (req.is_write) begin
        write_fifo(req.data);
      end else begin
        req.read_data = read_fifo();
      end

      // Report completion
      seq_item_port.item_done();
    end
  endtask

  // Actually write data to the FIFO
  task write_fifo(bit [7:0] data);
    @(posedge fifo_if.clk);
    fifo_if.write_enable <= 1;
    fifo_if.write_data <= data;
    @(posedge fifo_if.clk);
    fifo_if.write_enable <= 0;
  endtask

  // Actually read data from the FIFO
  function bit [7:0] read_fifo();
    @(posedge fifo_if.clk);
    fifo_if.read_enable <= 1;
    @(posedge fifo_if.clk);
    fifo_if.read_enable <= 0;
    return fifo_if.read_data;
  endfunction
endclass
Common Beginner Mistakes (And How to Avoid Them)
When learning UVM, beginners often make these mistakes:
Mistake 1: Trying to Learn Everything at Once
Problem: UVM has many features, and beginners often try to use all of them immediately. Solution: Start simple. Build a basic environment first, then gradually add features like coverage, complex sequences, and advanced configuration.
Mistake 2: Not Understanding the Hierarchy
Problem: Getting confused about which component should do what. Solution: Remember the verification hierarchy:
- Test = specific verification scenario (USB bulk transfers, power management, etc.)
- Environment = complete verification infrastructure
- Agent = protocol-specific verification component (USB host agent, device agent)
- Driver = stimulus generation (creates USB packets and timing)
- Monitor = passive observation (captures design responses)
- Sequencer = test coordination and scenario management
Mistake 3: Overcomplicating Transactions
Problem: Creating transaction classes that are too complex or try to do too much. Solution: Keep transactions simple and focused. One transaction should represent one operation.
Mistake 4: Ignoring the Phases
Problem: Not understanding when different parts of the testbench are built and connected. Solution: UVM has phases for a reason. Use build_phase for creating components, connect_phase for connecting them, and run_phase for the actual testing.
Why UVM Makes Verification Easier
Once you get comfortable with UVM, you’ll discover several advantages:
Reusability: Components you build for one project can often be reused in other projects. That FIFO driver you wrote? It can probably be used to test other FIFOs with minimal changes.
Standardization: When you join a new team that uses UVM, the testbench structure will be familiar, even if the specific design is different.
Debugging: UVM provides built-in features for printing messages, tracing execution, and understanding what’s happening in your testbench.
Scalability: As your designs become more complex, UVM provides the structure to handle that complexity without your testbench becoming unmanageable.
Simple Tips for Getting Started
- Start with examples: Don’t try to build everything from scratch. Find simple UVM examples online and modify them for your needs.
- Use the macros: UVM provides many helpful macros like
uvm_component_utilsanduvm_object_utils. They might look intimidating, but they save you a lot of typing and prevent common errors. - Focus on one piece at a time: Build your transaction class first, then your sequence, then your driver. Don’t try to build everything simultaneously.
- Use the messaging system: UVM’s
uvm_info,uvm_warning, anduvm_errormacros are your friends. Use them liberally to understand what’s happening in your testbench. - Don’t fear the documentation: The UVM User Guide might seem long, but it’s actually quite readable and has many examples.
A Simple Complete Example
Here’s a minimal but complete UVM testbench structure:
// The test - what we want to verify
class my_first_test extends uvm_test;
  `uvm_component_utils(my_first_test)

  my_env env;

  function void build_phase(uvm_phase phase);
    super.build_phase(phase);
    env = my_env::type_id::create("env", this);
  endfunction

  task run_phase(uvm_phase phase);
    write_read_sequence seq;

    phase.raise_objection(this);
    seq = write_read_sequence::type_id::create("seq");
    seq.start(env.agent.sequencer);
    phase.drop_objection(this);
  endtask
endclass

// The environment - contains all our testing infrastructure
class my_env extends uvm_env;
  `uvm_component_utils(my_env)

  fifo_agent agent;

  function void build_phase(uvm_phase phase);
    super.build_phase(phase);
    agent = fifo_agent::type_id::create("agent", this);
  endfunction
endclass

// The agent - coordinates driver, monitor, and sequencer
class fifo_agent extends uvm_agent;
  `uvm_component_utils(fifo_agent)

  fifo_driver driver;
  fifo_monitor monitor;
  uvm_sequencer #(fifo_transaction) sequencer;

  function void build_phase(uvm_phase phase);
    super.build_phase(phase);

    driver = fifo_driver::type_id::create("driver", this);
    monitor = fifo_monitor::type_id::create("monitor", this);
    sequencer = uvm_sequencer#(fifo_transaction)::type_id::create("sequencer", this);
  endfunction

  function void connect_phase(uvm_phase phase);
    driver.seq_item_port.connect(sequencer.seq_item_export);
  endfunction
endclass
What’s Next?
Once you’re comfortable with these basics, you can explore more advanced UVM features:
- Coverage: Measuring how thoroughly you’ve tested your design
- Configuration: Making your testbench flexible and configurable
- Factory overrides: Swapping components without changing code
- Virtual sequences: Coordinating multiple agents
- Register layer (RAL): Specialized support for testing registers
Conclusion: Your UVM Journey Begins
Learning UVM might seem overwhelming at first, but remember that every expert was once a beginner. Start with simple examples, build working testbenches, and gradually add complexity as you become more comfortable.
The key is to not get discouraged by the initial learning curve. UVM is a powerful methodology that will make you a more effective verification engineer, but like any powerful tool, it takes time to master. Focus on understanding the basic concepts first, then worry about the advanced features later.
Think of UVM as learning to drive a car. At first, you need to consciously think about every action—checking mirrors, signaling, steering. But once you’ve practiced, these actions become natural, and you can focus on where you’re going rather than how to operate the vehicle.
The same is true with UVM. Once you understand the basic structure and have built a few testbenches, the methodology becomes second nature, allowing you to focus on thoroughly verifying your designs rather than fighting with your testbench infrastructure.
Your journey into hardware verification with UVM starts with a single step. Take that step, build your first simple testbench, and you’ll be surprised how quickly you progress from beginner to proficient UVM user. The verification community is welcoming and helpful—don’t hesitate to ask questions and learn from others’ experiences.
Welcome to the world of UVM! Your designs will thank you for taking the time to learn this valuable methodology.